When I first came up with the name Bread Journey it seemed almost random to me. I cannot recall all the other options I’ve tried on while my fingers were hovering impatiently over the keyboard, but I know there were a few others, but they didn’t feel right. Bread Journey did feel right, although I didn’t know why back then. Now I do.
You probably know I’m obsessed with decorative scoring. Part of the reason I started beautifying my breads was because I wanted to feel like I wasn’t making the same loaf over and over again because, in a sense, I was. I am very traditional when it comes to the taste profile of my bread. I deeply admire everyone who experiments with add-ins, spices and herbs. I swoon over pictures of bread with hazelnuts, saffron, cheese, chili peppers, chocolate, sun-dried tomatoes etc. etc. etc. I love to look at them, but I cannot make myself bake one of those because I just like the taste of bread so much.
To me, the taste of honest flour, fermented to perfection, embellished by the sourness of lactobacilli, is the best thing that can come out of the oven and I do not dare upset the balance with other flavors.
My bread is usually half white and half a mix of whole grains – wheat and spelt, sometimes rye. You can see my trusty recipe here. Well, that used to be my trusty recipe, in any case. This brings us to why I started writing this entry.
I have been so convinced that I was making the very same unchanged loaf hundreds of times that I was slightly taken aback to realize how wrong I was. Over the time I tweaked a little something here, added a detail there, and kept tugging and pulling at what I thought was an unchanged process. Now I see that what I perceived as static was an evolution. It was a journey. For those of you who have been with me on this path I would like to take the time and share what I learned. These aren’t recipes or clear-cut methods. Nothing of what I will lay down is a law or rule. These are things I learned for myself. Part 1. No one knows how many more there will be and which of these discoveries will stay with me, but for now I am here. Let’s begin.
Starter
If you’ve read this you know that I work with a rye starter and that I absolutely love it. It doesn’t have the floating fluff of the white, but my-oh-my does it have flavor and aroma! I like how stable and sturdy it is, how it stays alive and strong through thick and thin. It allows me to make wholegrain bread and rye loaves, but also panettone and croissants. Since rye is so potent and you need so little for inoculation, you can go from rye starter to white or whole grain levain in one single feeding, a feat that isn’t so easy in the opposite direction. This way I can maintain only one starter but bake whatever I want. The only thing I wasn’t quite happy with was how hungry my starter was and how fast it deflated. Feeding it twice a day just didn’t fit my schedule.
The conundrum was solved by a wonderful baker from Russia, Oksana Kouznetsova, whose informative posts about sourdough opened my eyes to how strong my starter really was! It turns out that rye only needs about 3% inoculation, so now instead of retaining 25g of my starter I go with only 3g per 25g of water. I also feed it a bit stiffer, so that it’s about 90% hydration. Wow, did that make a difference! My starter now smells like fruit and flowers all day long with one feeding per day and it’s stronger than ever.
Fermentation
This is one of the most fascinating and problematic parts of bread making. It is here that so many stumble – students and teachers alike. How do you know what went wrong? How do you come up with the right directions? It was precisely this mentality of strict rules that I had to let go of before I could move on. The dough will not adapt to the changing environment, so I have to adapt instead. As the temperature in my kitchen went up, I found that on warm days my beloved slap-and-fold hurt the dough more than it helped. In April it started to stick to the countertop, gluten strands pulling and tearing. You might remember that I work with all-purpose flour, so I can’t just trust the dough hold its own without adjustments. Surprisingly, the answer was simple and straightforward – longer autolyse! I pushed it from 30 minutes to two hours and the change was impressive! Different bakers have different preferences for autolyse time so previously I had decided to go with the shortest option, to save time. Now I’d rather send underfproofed dough to the fridge than rush autolyse!
Pre-shape and Shaping

Pre-shape in and of itself was a stage of which I was skeptical. I mean… the dough just lays there. Surely it can do the laying around in the basket in the fridge, so I can get some sleep too. All the justifications I had found online were intricate and lengthy, but, to my mind, none got to the simple point of why can’t I shape the dough right away. I had to find out on my own and what I learned was that divided, pre-shaped and relaxed dough stretches easily and doesn’t stick as much, allowing for tight, neat shaping. Speaking of which… Turns out I was doing that one wrong too! Somehow the regular kind of boule shaping just wouldn’t hold. Overnight the seam unfolded, compromising surface tension. So what did I do? I started “stitching” it right after I put it in the basket and the gas was neatly trapped inside. Check it out here!
Scoring
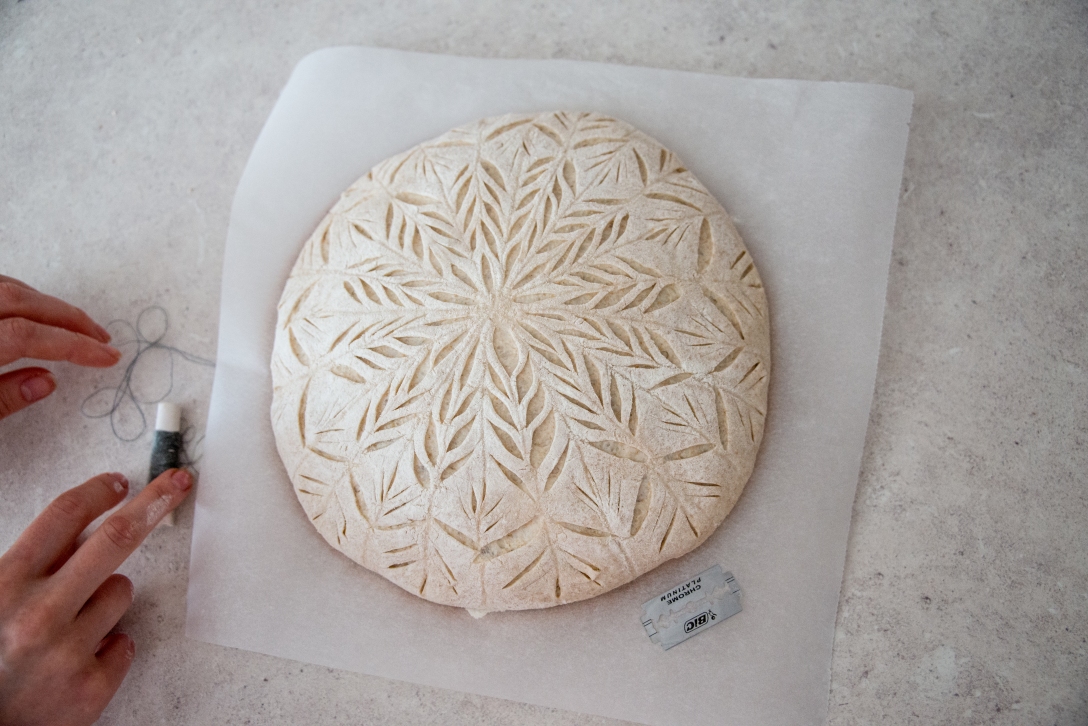
Oh where do I start…? I feel like in this chapter I have something to learn every day. I have collected some of my learned lessons here and will definitely have many more for part two, but I will share one of the greatest revelations now.
No blade is sharp unless it’s a new blade. Only use every corner once, meaning a blade can only last four times.
This might sound wasteful, but intricately scored bread isn’t exactly practical either. Beauty demands sacrifice! Now, how do I know which corner of the blade had been used? I mark it off with nail polish. You’re welcome!
Baking
Finally we’ve made it to the straightforward stage. Yet, this doesn’t mean there is nothing to learn. I still stick with the same times and temperatures, but I realized I wasn’t using nearly enough steam, so now instead of one pullman pan of water I use two big bowls and set them inside to boil 10 minutes before the bread goes in. I also heat up the stone a lot longer than I used to – 1,5 – 2 hours at 275 celsius. If you feel guilty using up electricity like that you can compensate by using the residual heat of the stone to bake potatoes or pumpkin afterwards.

These might not be textbook rules, but it’s what I stumbled across on my journey. Let’s move along and see what else awaits!

Loved this post! I might change to rye starter now, I sometimes use it when my starter feels sluggish, but then I revert to white… I guess there’s really no need to do that.
I tend to make sourdough with nuts and seeds in it because we love it, but to me nothing beats the taste of a simple sourdough with mostly white flour and a touch of spelt (or rye)
LikeLike
Thank you so much, Sally! I really love the flavor of rye and I might actually be addicted to it 🙂
LikeLike
Thanks for this and other excellent posts you have. Can’t wait for part 2 of this post. Your Instagram is like an art gallery! Such beautiful designs! I’ve subscribed to your Youtube channel too.
LikeLike
Thank you so much for making the time to read this! I’m still collecting wisdom for the follow-up 😊
LikeLike