To me the best thing about baking sourdough is that it can be as easy or as complicated as you want it to get. To someone who has been baking for years this means that you can keep perfecting your craft to your heart’s content. For a beginner this means that you can make great bread with what you already have in your kitchen. But where do you start? Sometimes this simple process might appear daunting and complicated, but that’s because you’re at the doorstep of something truly grand! As with any new endeavor it’s important to find a starting point that feels right to you and a style you feel you can follow. There certainly are many sourdough recipes around but this one is written with a beginner in mind, made specifically to help you bake your first wonderful bread and maybe it’s the sign you needed to start making your own bread. Let’s dive right in!
What do you need?
As I mentioned above, you really don’t need anything unusual to start your first bread. As you bake more you will learn to appreciate some baking tools like scales, bench knives, banetons and proofers, but that will come later. Right now you can get baking with what you certainly have. This recipe assumes you are already in the possession of a sourdough starter, but if that’s not the case you can learn to make one here. Now that you’re ready to discover the world of fantastic bread all you need is:
- water
- flour*
- salt
- sourdough starter
- a large bowl
- a medium bowl
- a linen or cotton towel
- parchment paper
- blade or sharp knife (a craft knife will do in a pinch!)
*What kind of flour? Good question! There are many kinds with many effects and while you can make bread with almost any flour, I recommend you get a bag of white stoneground flour (not the same as regular white). This flour will be easier to handle than wholegrain but will give you a more flavorful loaf than white bread flour. You can also mix half white bread and half wholegrain flour if you have those handy.
Ready? Let’s get baking!
Making the pre-ferment
What I refer to as the pre-ferment is also called starter, levain, and half a dozen of other names. It is essentially sourdough starter diluted with water and flour specifically for the purpose of baking. We will be calling it here pre-ferment to differentiate it from the starter that you feed every day (or keep in the fridge). This you will mix in the morning, about 5-8 hours before you actually make the bread. For this you will need:
- 50g (about a shot glass) water
- 15g (a heaping teaspoon) starter, which can be straight from the fridge
- 50 g (about 7 tablespoons) flour
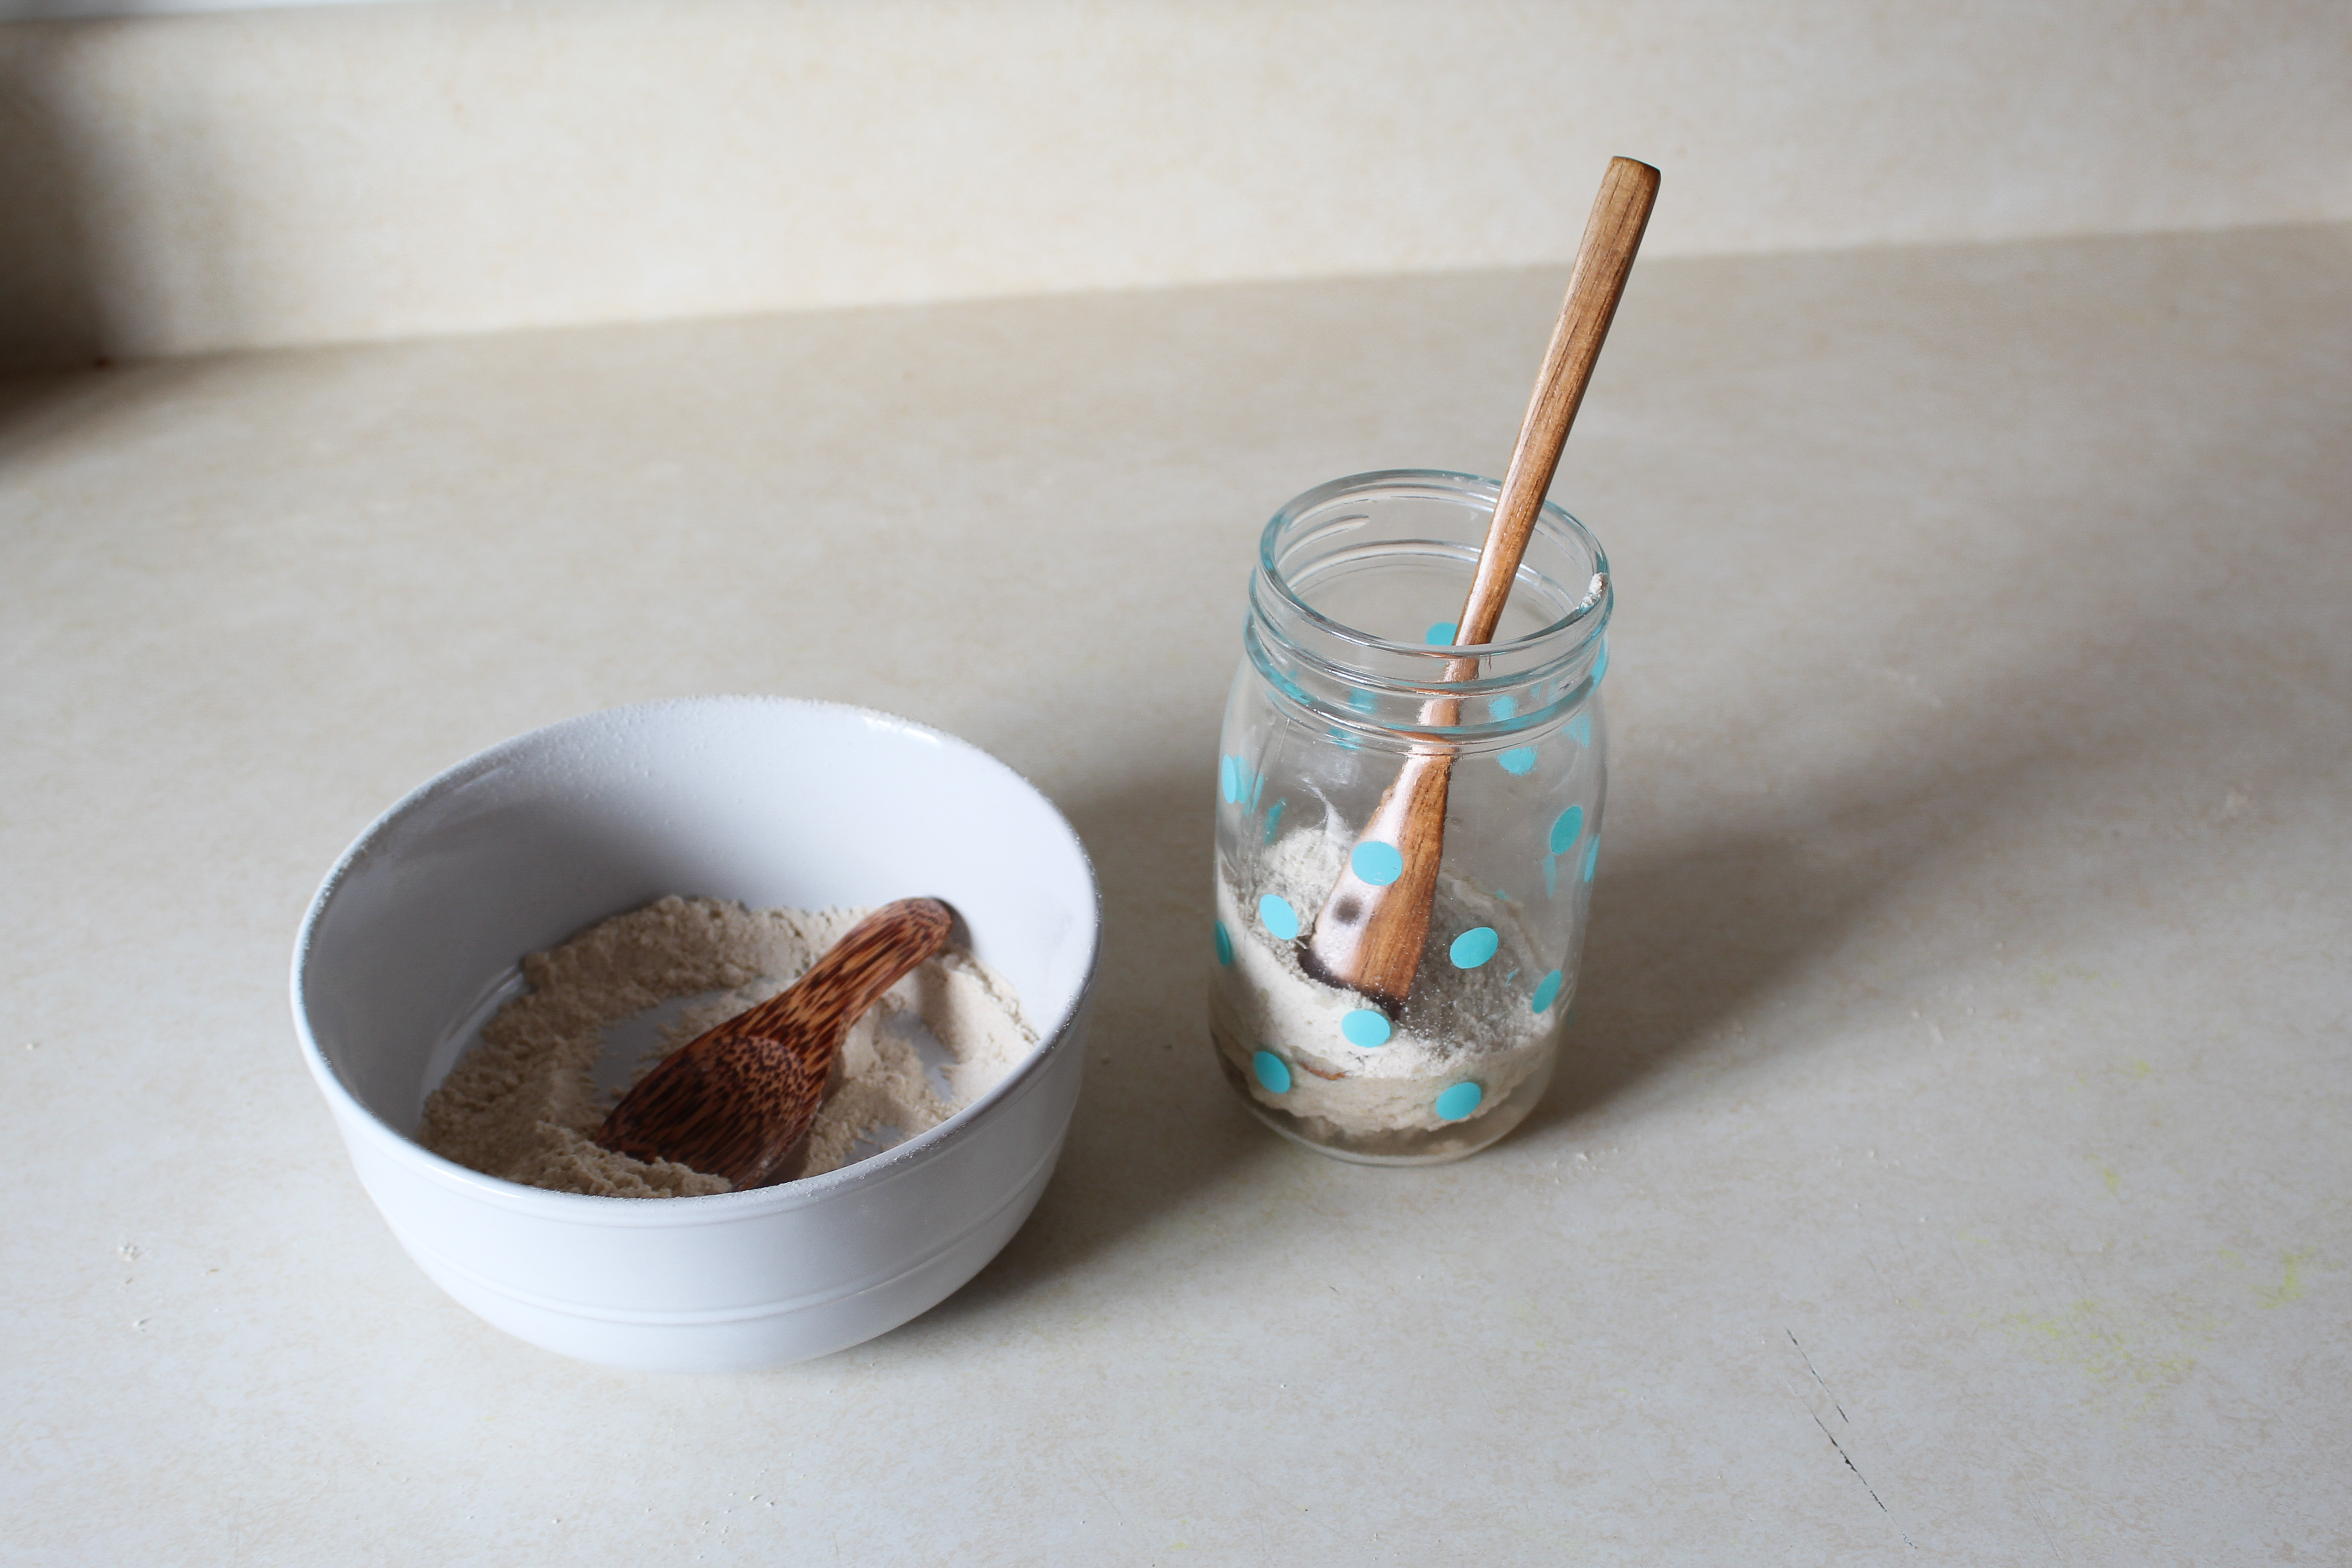
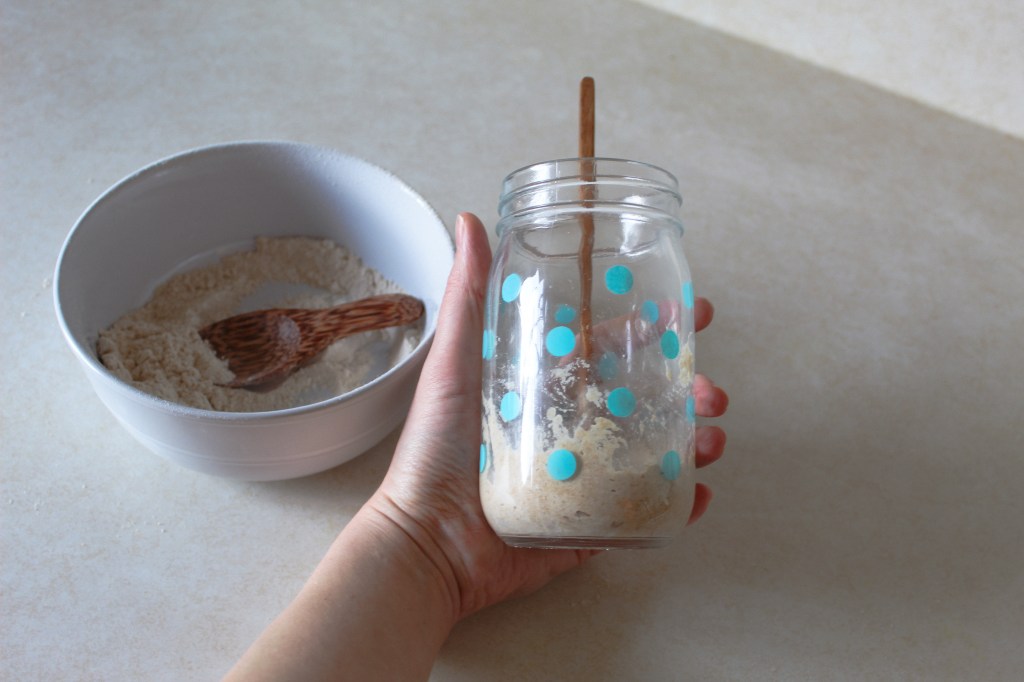
Pour the water into a jar, add the starter and then start adding flour. If you have kitchen scales you can weigh all the ingredients and mix them right away. If you don’t, start with 6 spoonfuls of flour into the water and starter and keep mixing and adding a little more flour until you reach the consistency of peanut butter.
Close your jar and let it ferment at room temperature. If your house is very warm the starter will be ready in 4-5 hours. If it is cool you can either keep it on the counter for 7-8 hours or you can put it in the cold oven with the light on and leave it for 5 hours.
Here’s what it looks like right after mixing…
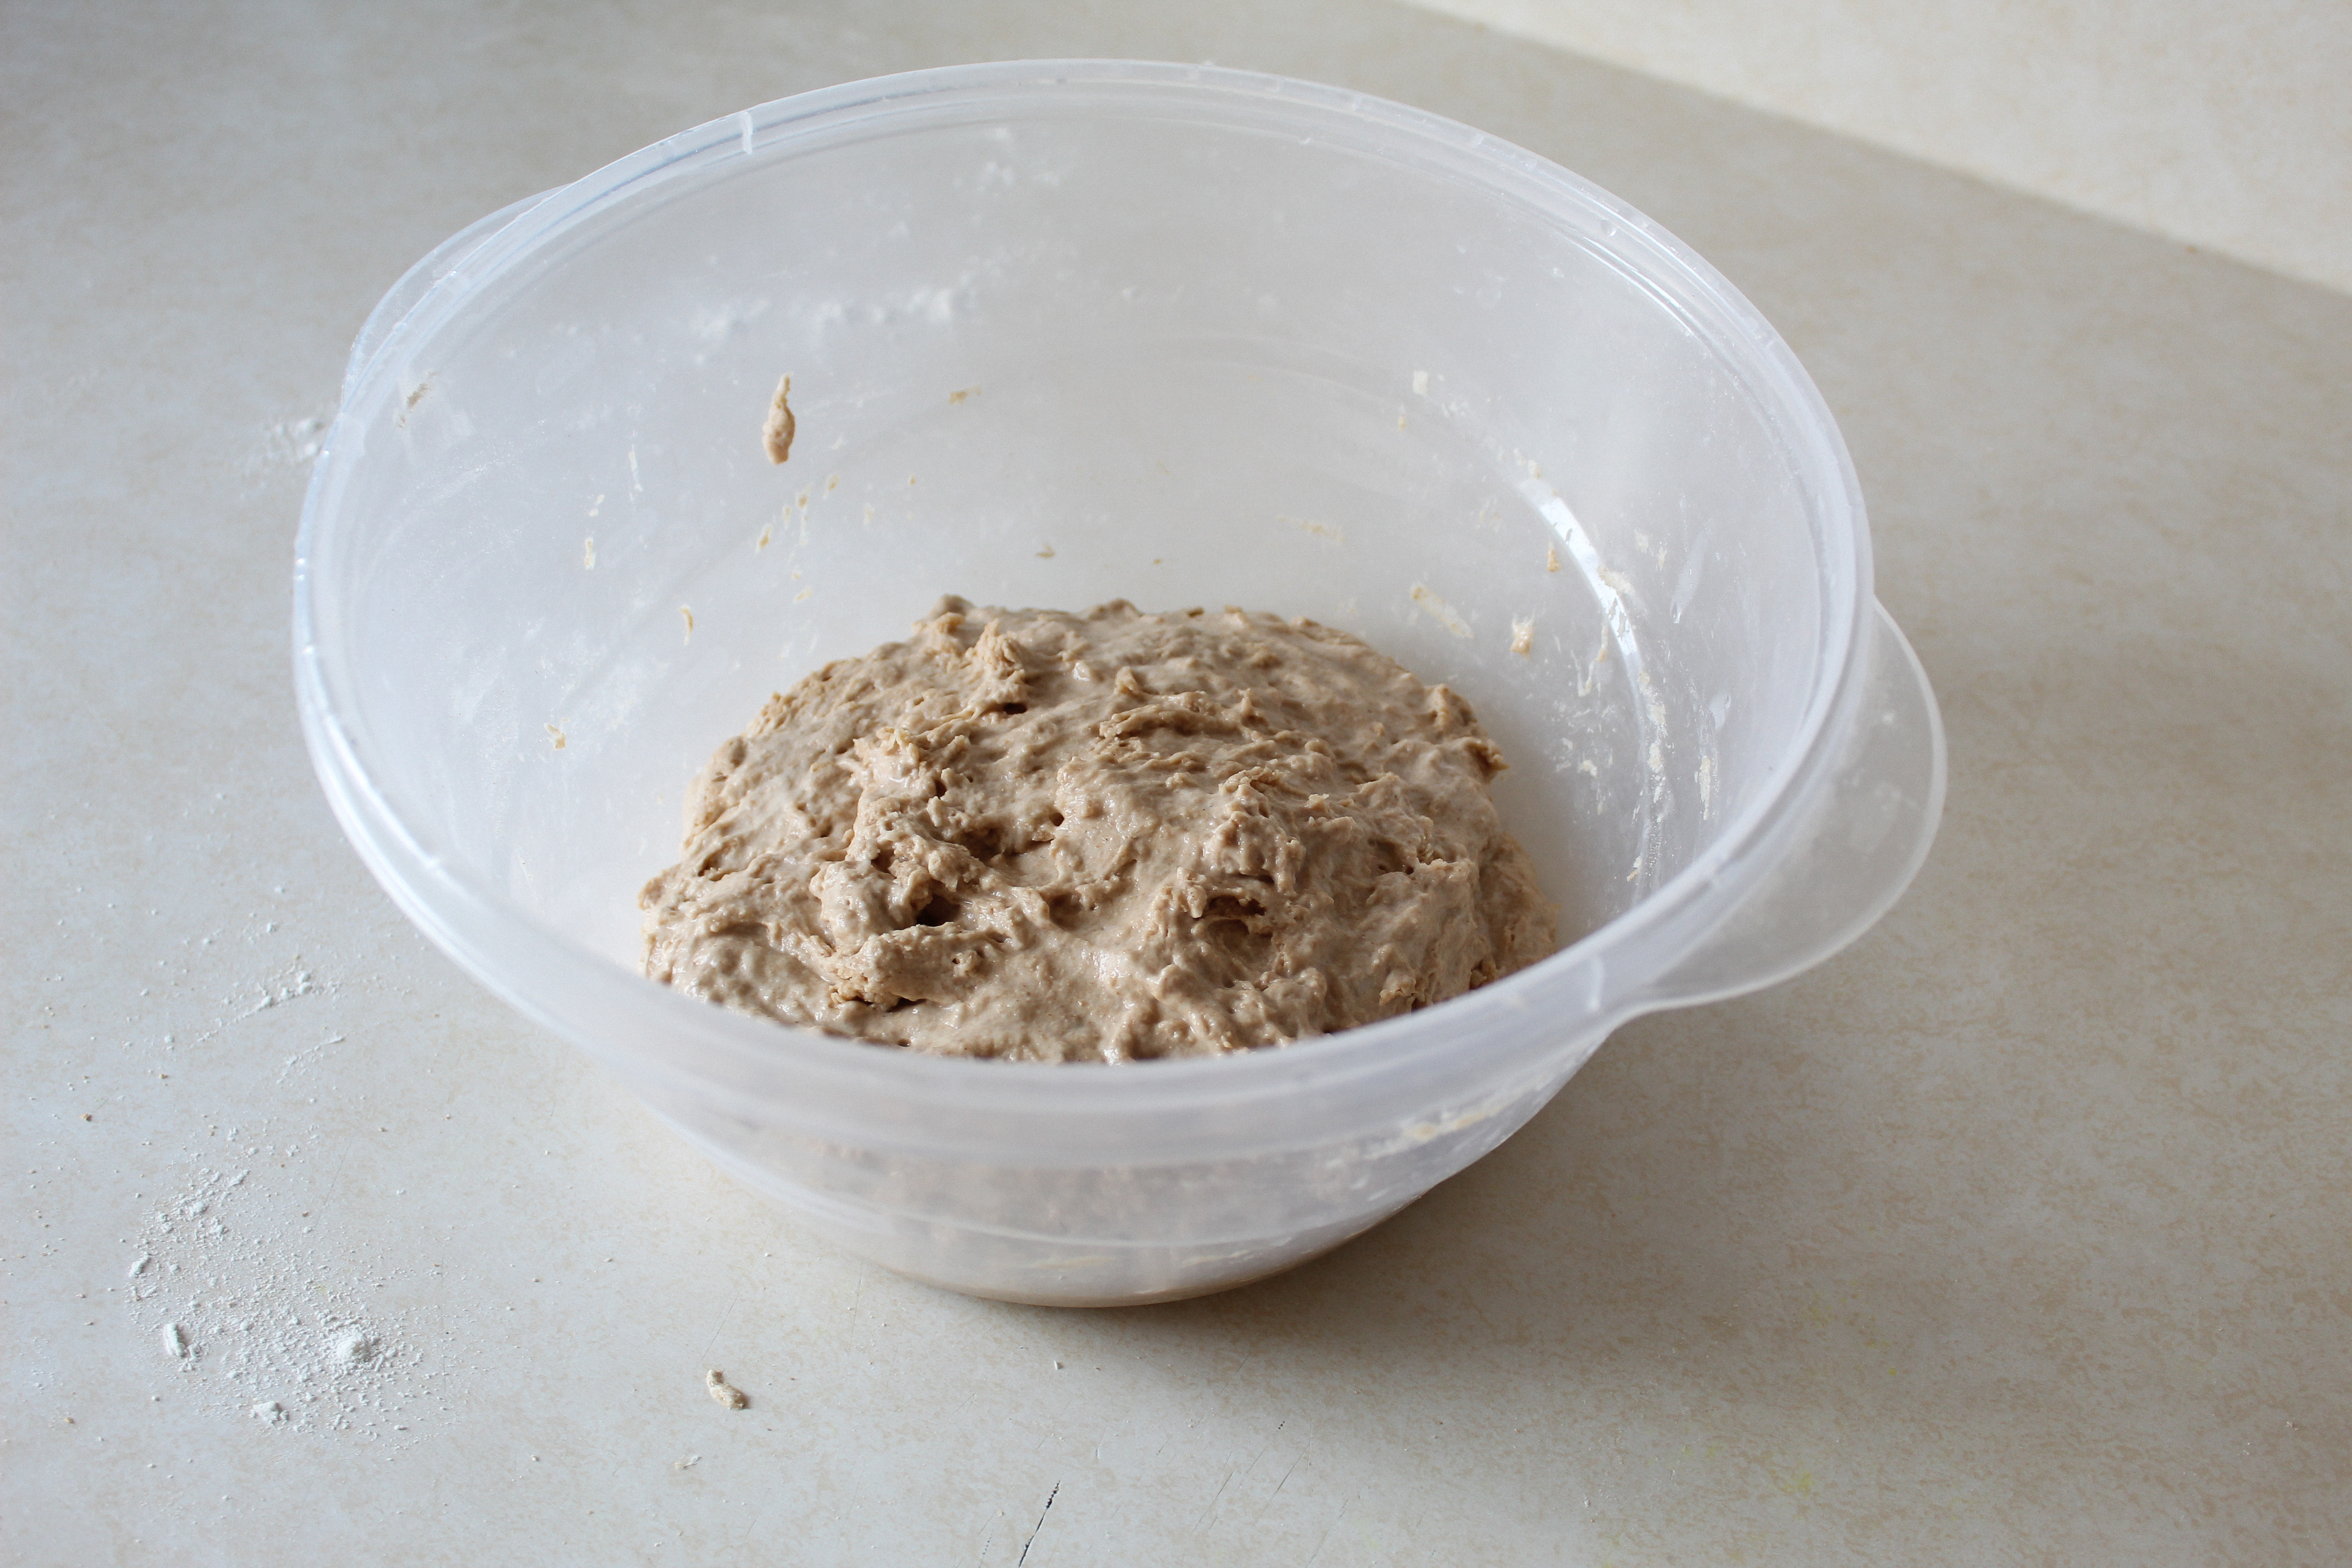
… and here is the pre-ferment after 5 hours in a warm room.

You will know the pre-ferment is ready for bread when it has more than doubled in size and you can see that it is full of bubbles.
Mixing the dough
Now it is likely late afternoon and we are ready to make the bread. You will need a deeper bowl for the dough and the following ingredients (for one bread):
- 300g (1 and 1/4 cup) water
- 400g (3 and 2/3 cups) flour
- 8g (1 and 1/2 tsp) salt (this will be added later)
- all of the pre-ferment
Measure the water into a deep bowl and then pour in your pre-ferment. You will see that it is stringy and airy and that it floats on top of the water.

Next step add the flour. If you are weighing it you can just trust the scales. If not – start with three cups and add more flour as necessary until it resembles the structure in the picture. As you’re mixing it all with your hands, keep in mind that you are not striving to achieve a smooth dough at this stage. You want to end up with a mixture that has no dry streaks of flour, but is still lumpy. It has to be soft, but still hold its shape.


Now cover the bowl and let it sit at room temperature for thirty minutes. In this time the dough will become smoother and stretchier without any work. You will easily notice the transformation!
Now sprinkle the salt and pour a spoonful of water on top. To mix the salt, stab all your five fingers into the dough, pinch and twist.

Repeat this move a few times, making sure you work all around the dough, until you notice the bottom comes off of the bowl. The dough will get smoother and less sticky as it is saturated with salt. Now cover the bowl and leave it at room temperature for 30 minutes.
“Kneading” the dough
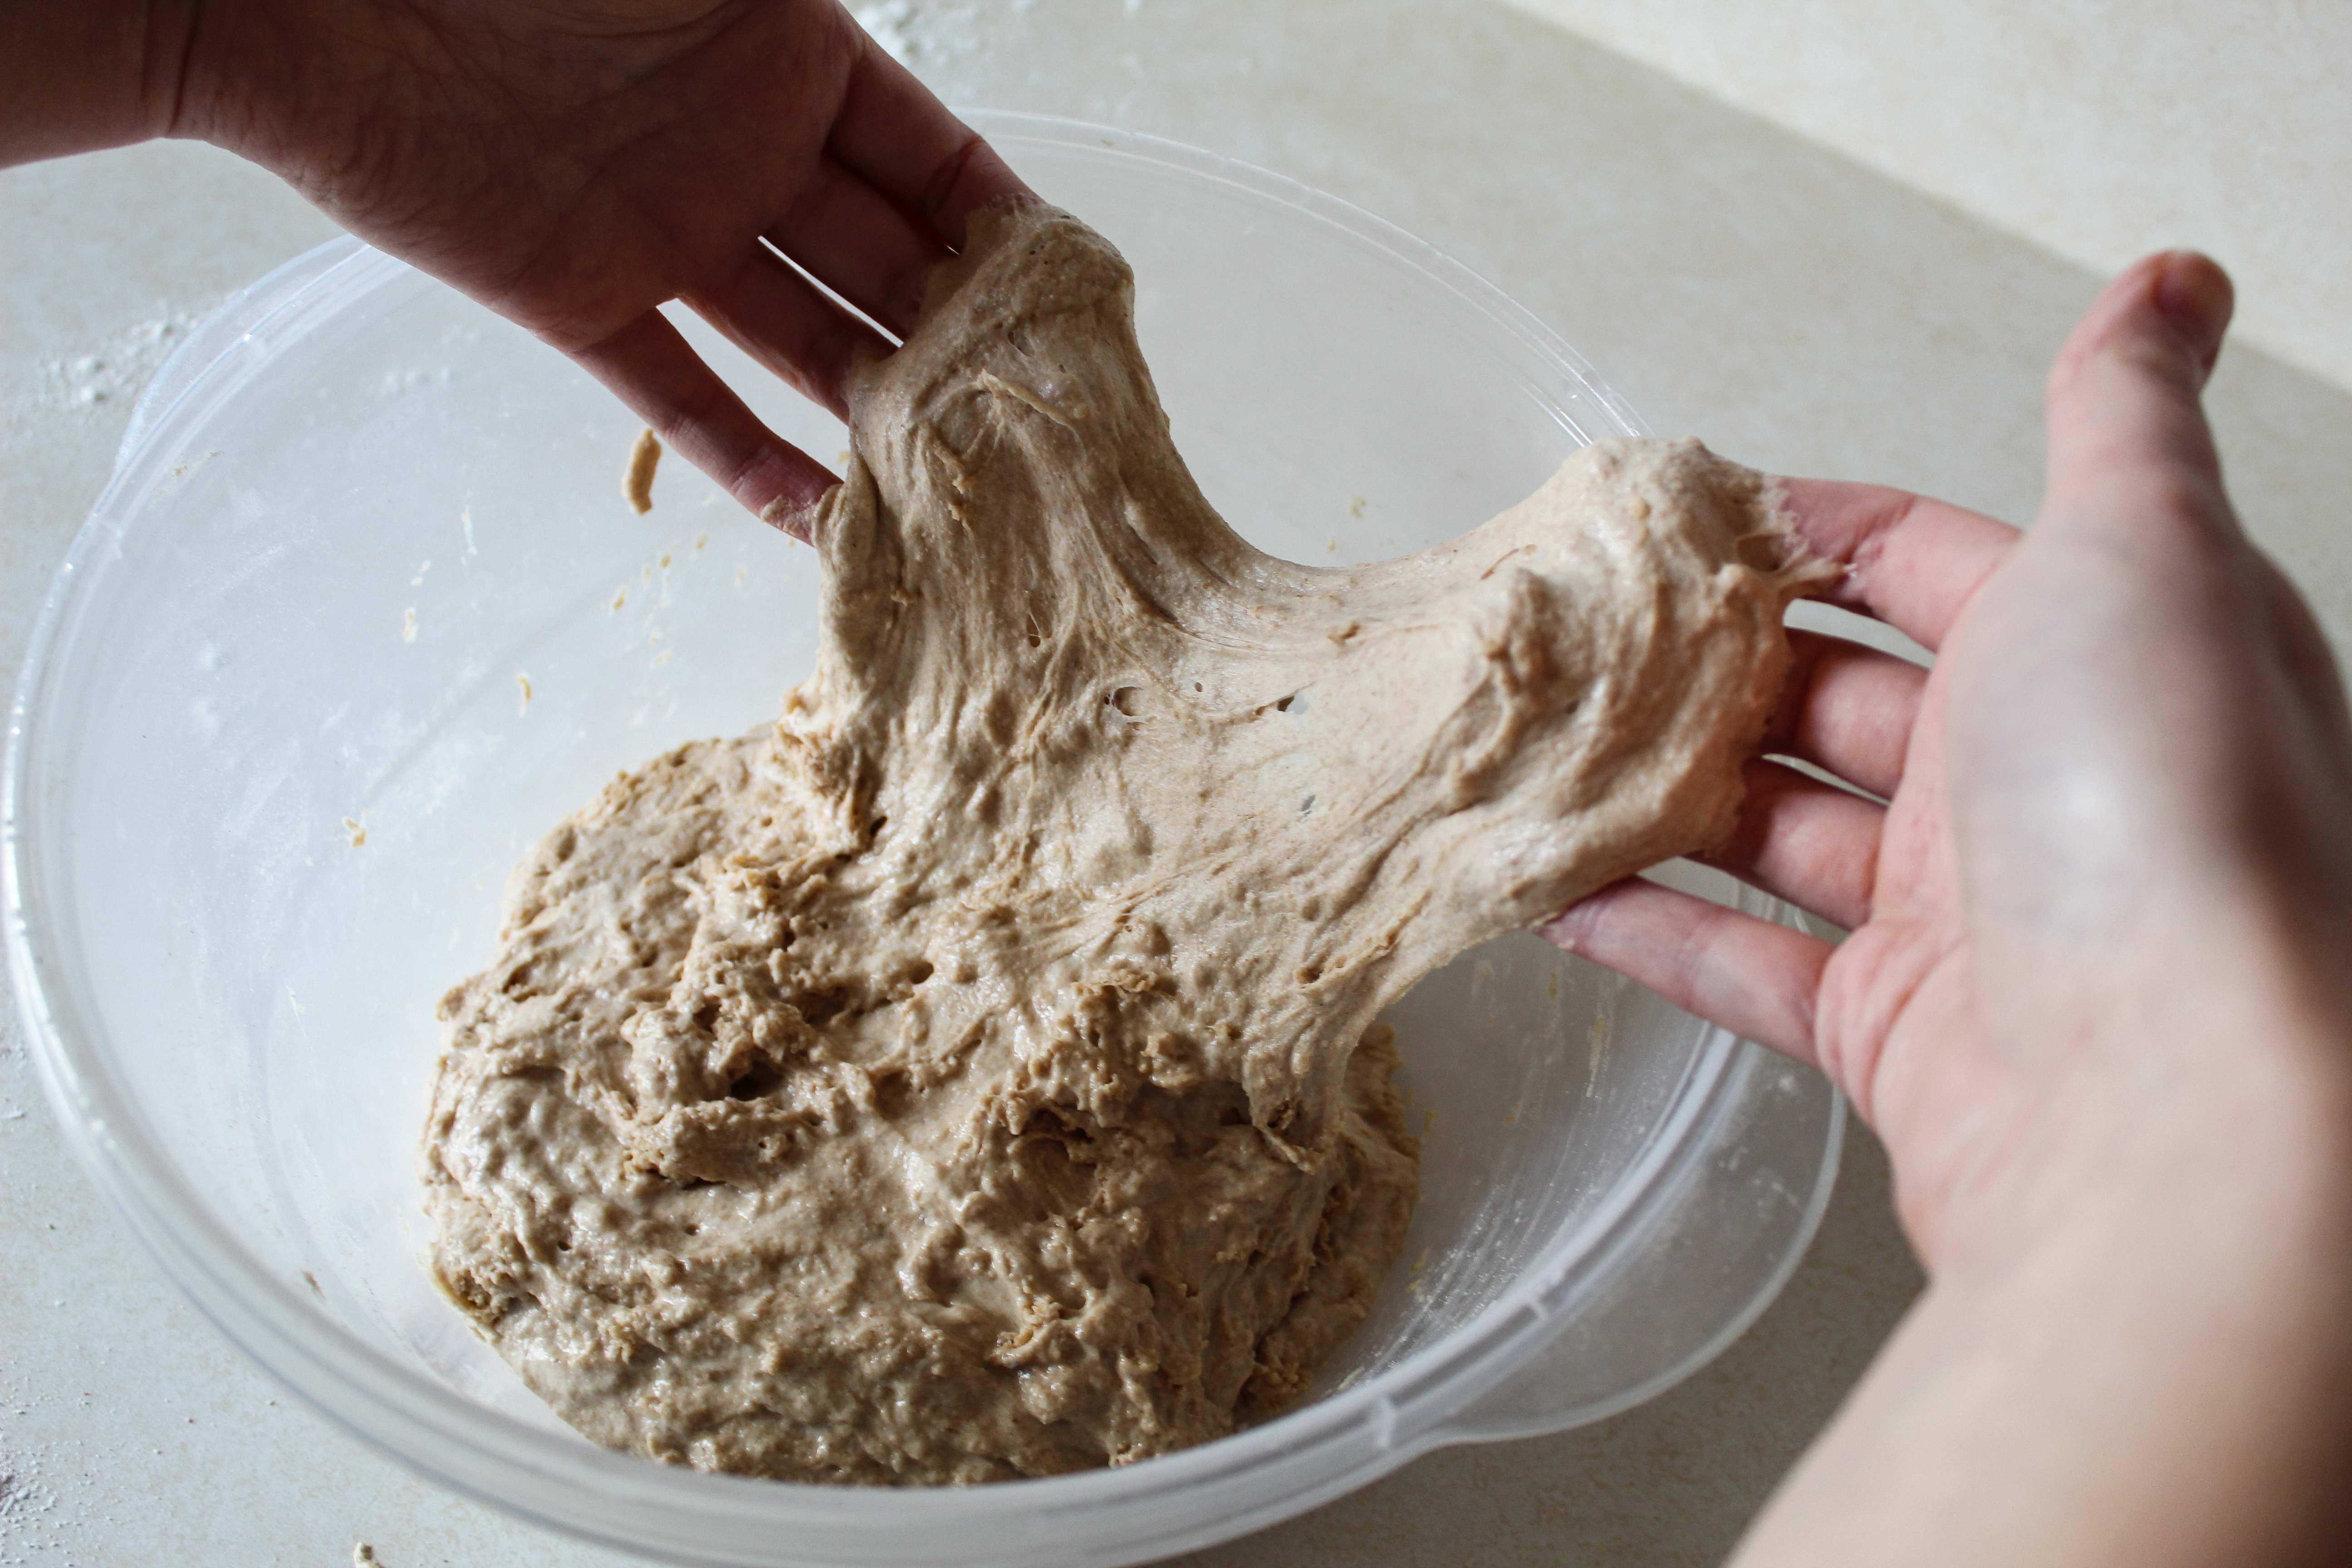
After 30 minutes you will start working the dough. This stage is different from kneading, although it does to your dough what kneading would do, making it strong and elastic. To achieve this bakers use a technique called stretch-and-fold where you grab about a third of the dough from underneath, stretch it upwards, and then fold it either on top or underneath the rest. After you have stretched and folded the dough from one side, rotate the bowl a little and stretch and fold again. Rotate and repeat until you reach the starting point. You should make about 4-5 stretches. The video below illustrates how to perform this step.
Try to do this gently, without ripping the dough. It helps to wet your hands and to start by prying the dough from the edges and then the bottom of the bowl. After you have performed one set of stretches, cover the bowl and leave it for 30 minutes. Repeat this step a total of three times making 3 sets of stretch-and-fold over the span of 1,5 hours. You will notice how your dough changes, becomes more pliable and doesn’t stick as much. After the third set of stretches it will look like this:

Now cover it one last time and leave it for 1,5 hours at room temperature, until it puffs up and almost doubles. If your room is hot, the dough will only need an hour. If it is very cold, consider putting it in the cold oven with the light on for the first 30 minutes, or leave it for 2 – 2,5 hours.
Shaping
Now the dough is ready to be shaped – a process that is performed in two stages. For the first stage make sure your hands and your countertop are wet. Gently pry the dough away from the bowl and let it flow face down onto your table. One by one take the edges of the dough and fold them upwards, as if folding and envelope. You will now have the ball of dough face down, seam up. Gently flip it over and round it a little. You can see this in the video below.
After you perform this step, dust the dough with flour and cover it with a clean towel for 15 minutes (or 10 if your room is hot). During this time the dough will relax a little and will become easier to shape.
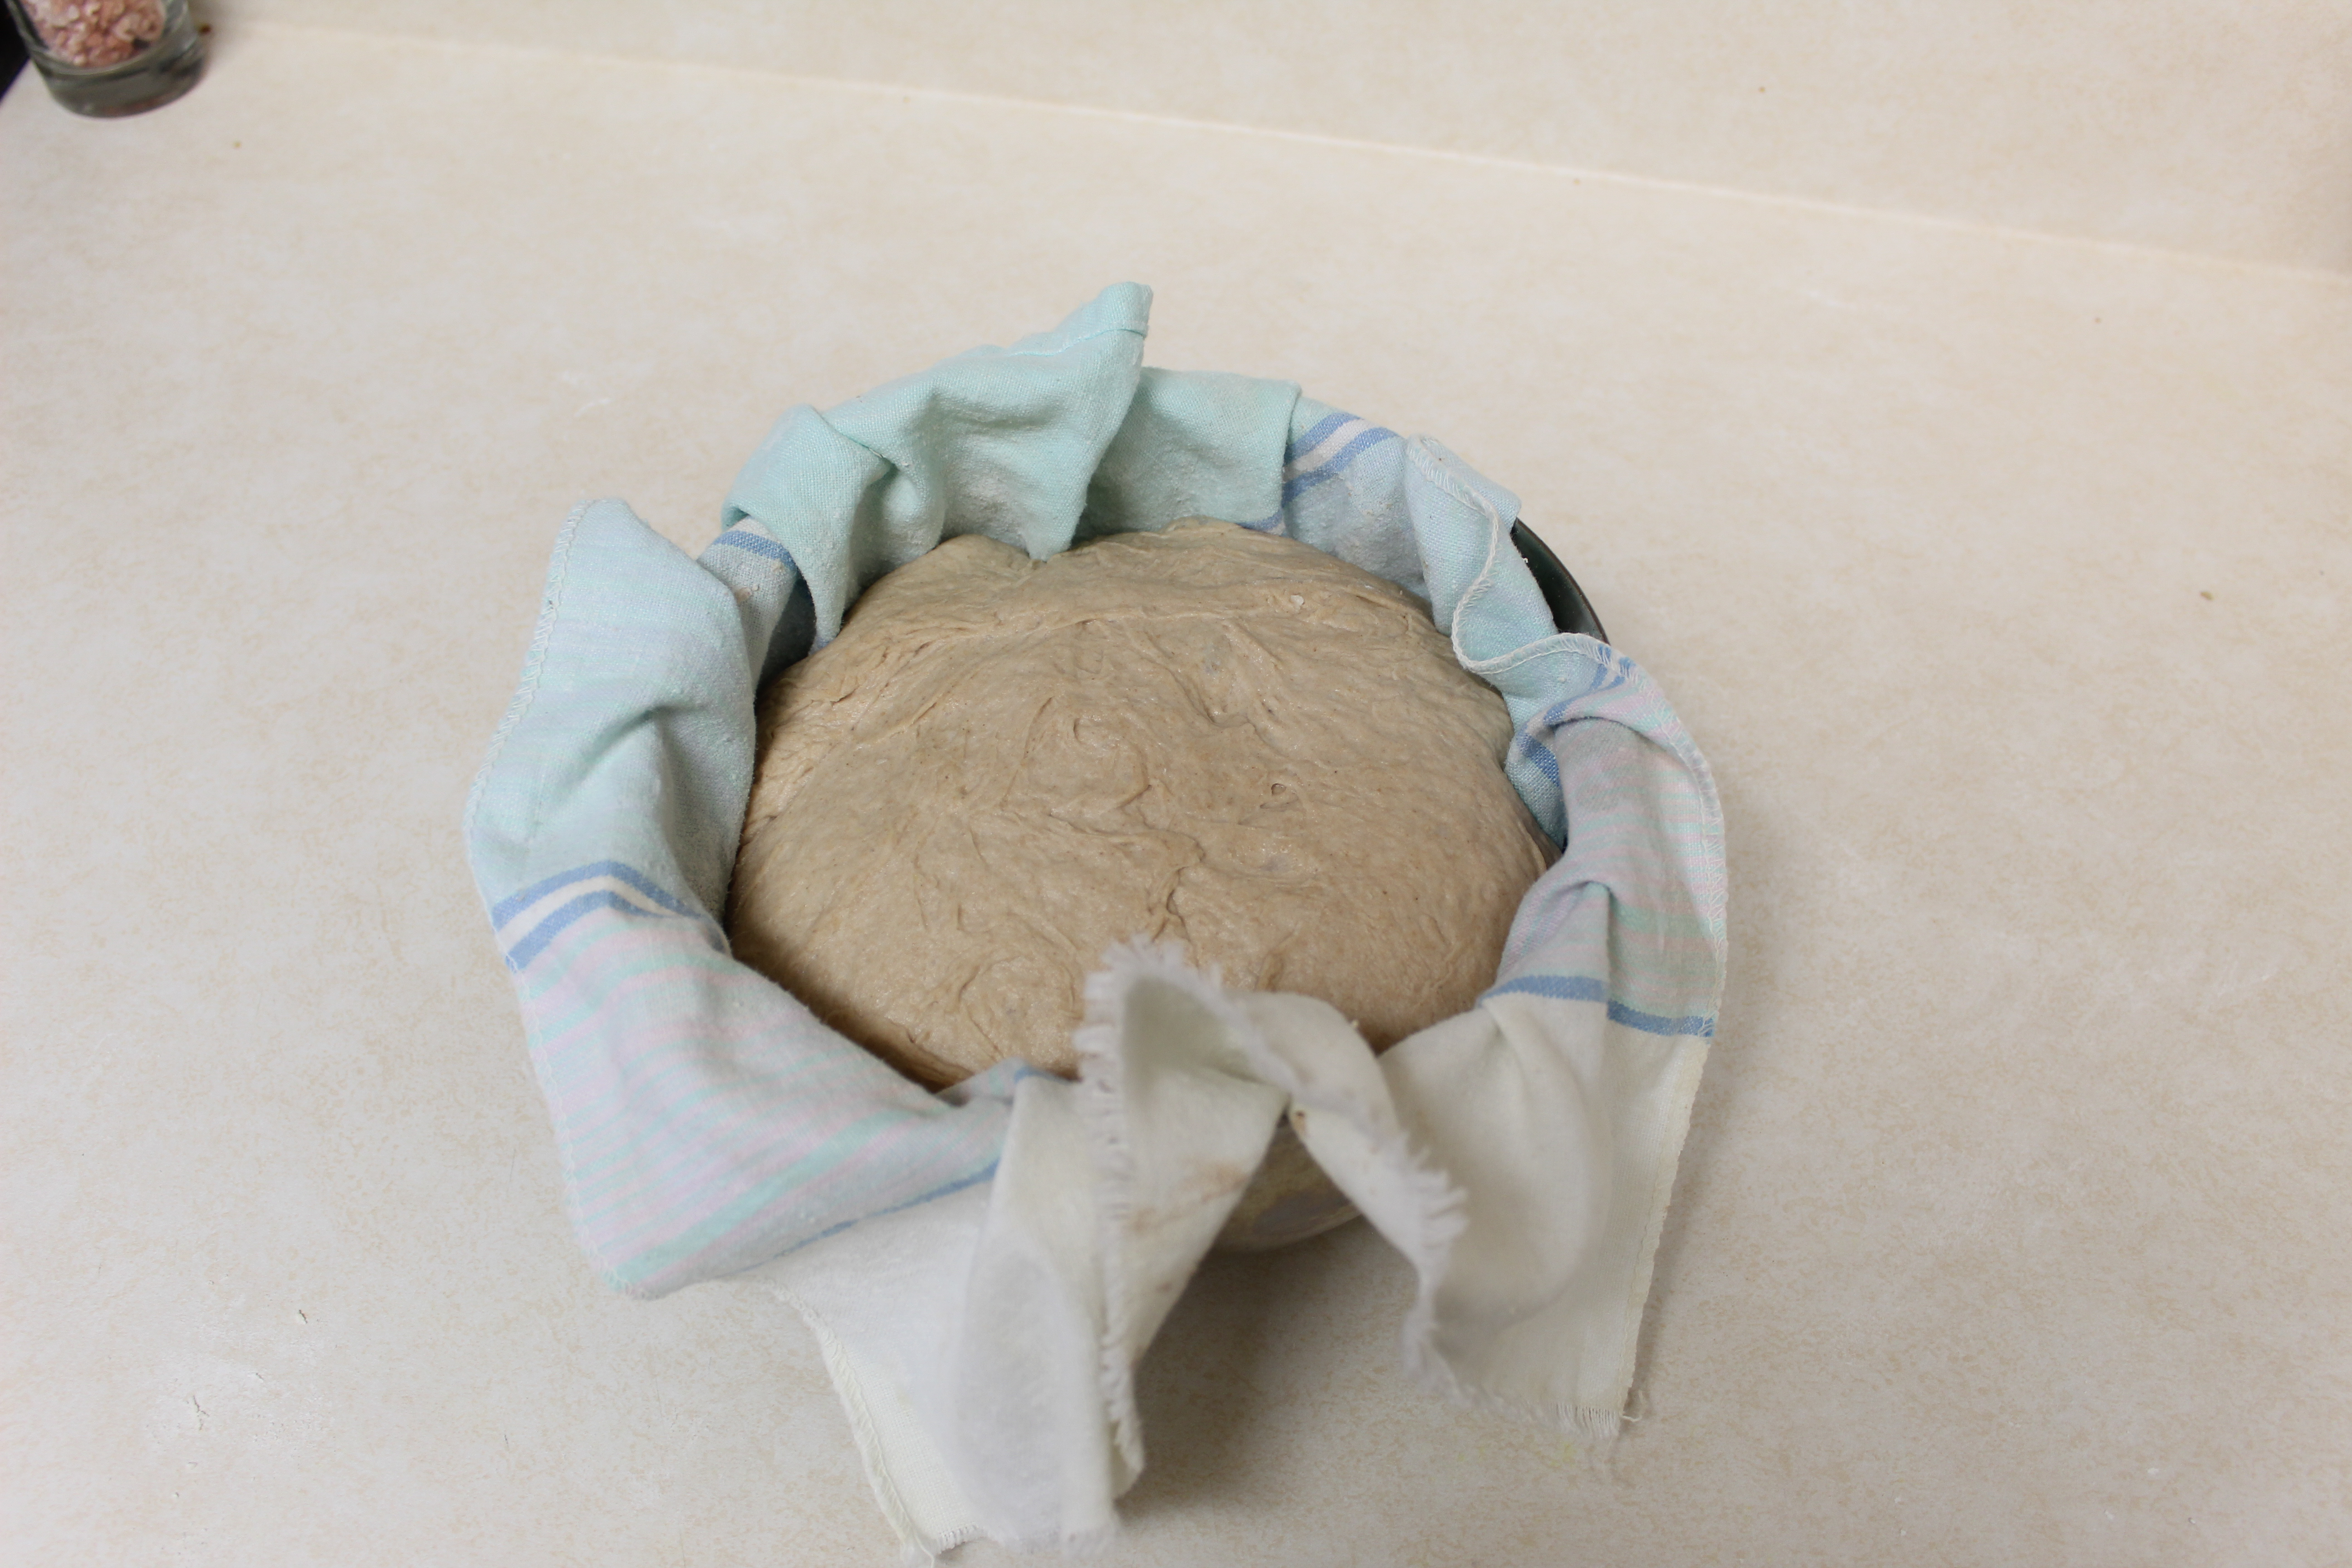
As the bread-to-be is getting ready for the final shape, prepare your makeshift bread basket. Take a medium-sized bowl, line it with a clean linen or cotton towel and dust it with flour.
After the waiting time is over, dust the countertop and the dough with flour. You will now need to flip it over and this is easier to do with wet hands. Grab the dough from underneath and gently flip it so its floured side rests on the floured countertop. Now you will need to flour your hands and perform the same steps as you did for the pre-shape. When you have the ball round and smooth, pick it up and put it face down into your lined bowl. Watch me perform this step here:
After your dough is in the bowl, cover it with a plastic bag and put it in the fridge overnight for 6-10 hours. This seems like a wide range and that’s because fermentation in the cold is very slow and forgiving. Less than 6 hours will likely not be enough, but after that you can be flexible and, if needed, even go beyond the 10-hour upper limit.
Baking
We’re almost there! How we’re going to bake the bread depends on the gear you have. Do you have a dutch oven or an oven-safe pot with lid? Great! Do you have a baking stone? Even better! But we can make it work even if you have neither of these.
If you have a pot or a stone, put them in the oven on the bottom third rack and let the oven run for 40 minutes at the highest temperature it can go. If you don’t have any of these, turn a baking tray upside down, put it in the bottom third slot and heat the oven to the highest temperature for as long as it requires. Do you have a large stainless steel bowl? If yes – great! Set it aside and we’ll need it later. If not, as the oven heats boil a pan of water and put it in the oven on the bottom rack. You can either pour it into another baking tray, or into an oven-safe pan placed on the oven floor. You need to put the boiling water in the oven if you’re baking on a stone as well.
Now that the oven’s ready for work let’s get back to the bread. Here’s what it looked like when we put it in the fridge last night…

… and here it is today, all puffed up!
Take a square of parchment paper large enough to cover the bowl. Put it on top of the bread and cover it with a pizza peel, a cookie sheet or a large wooden cutting board. Flip! Remove the bowl and the towel to reveal the face of the bread. If the towel stuck to the dough – don’t worry! Simply wet the stuck spot and it will peel right off. For a bubbly, crunchy crust wet your bread generously.
Now take your blade or knife and make a few slashes on your bread.
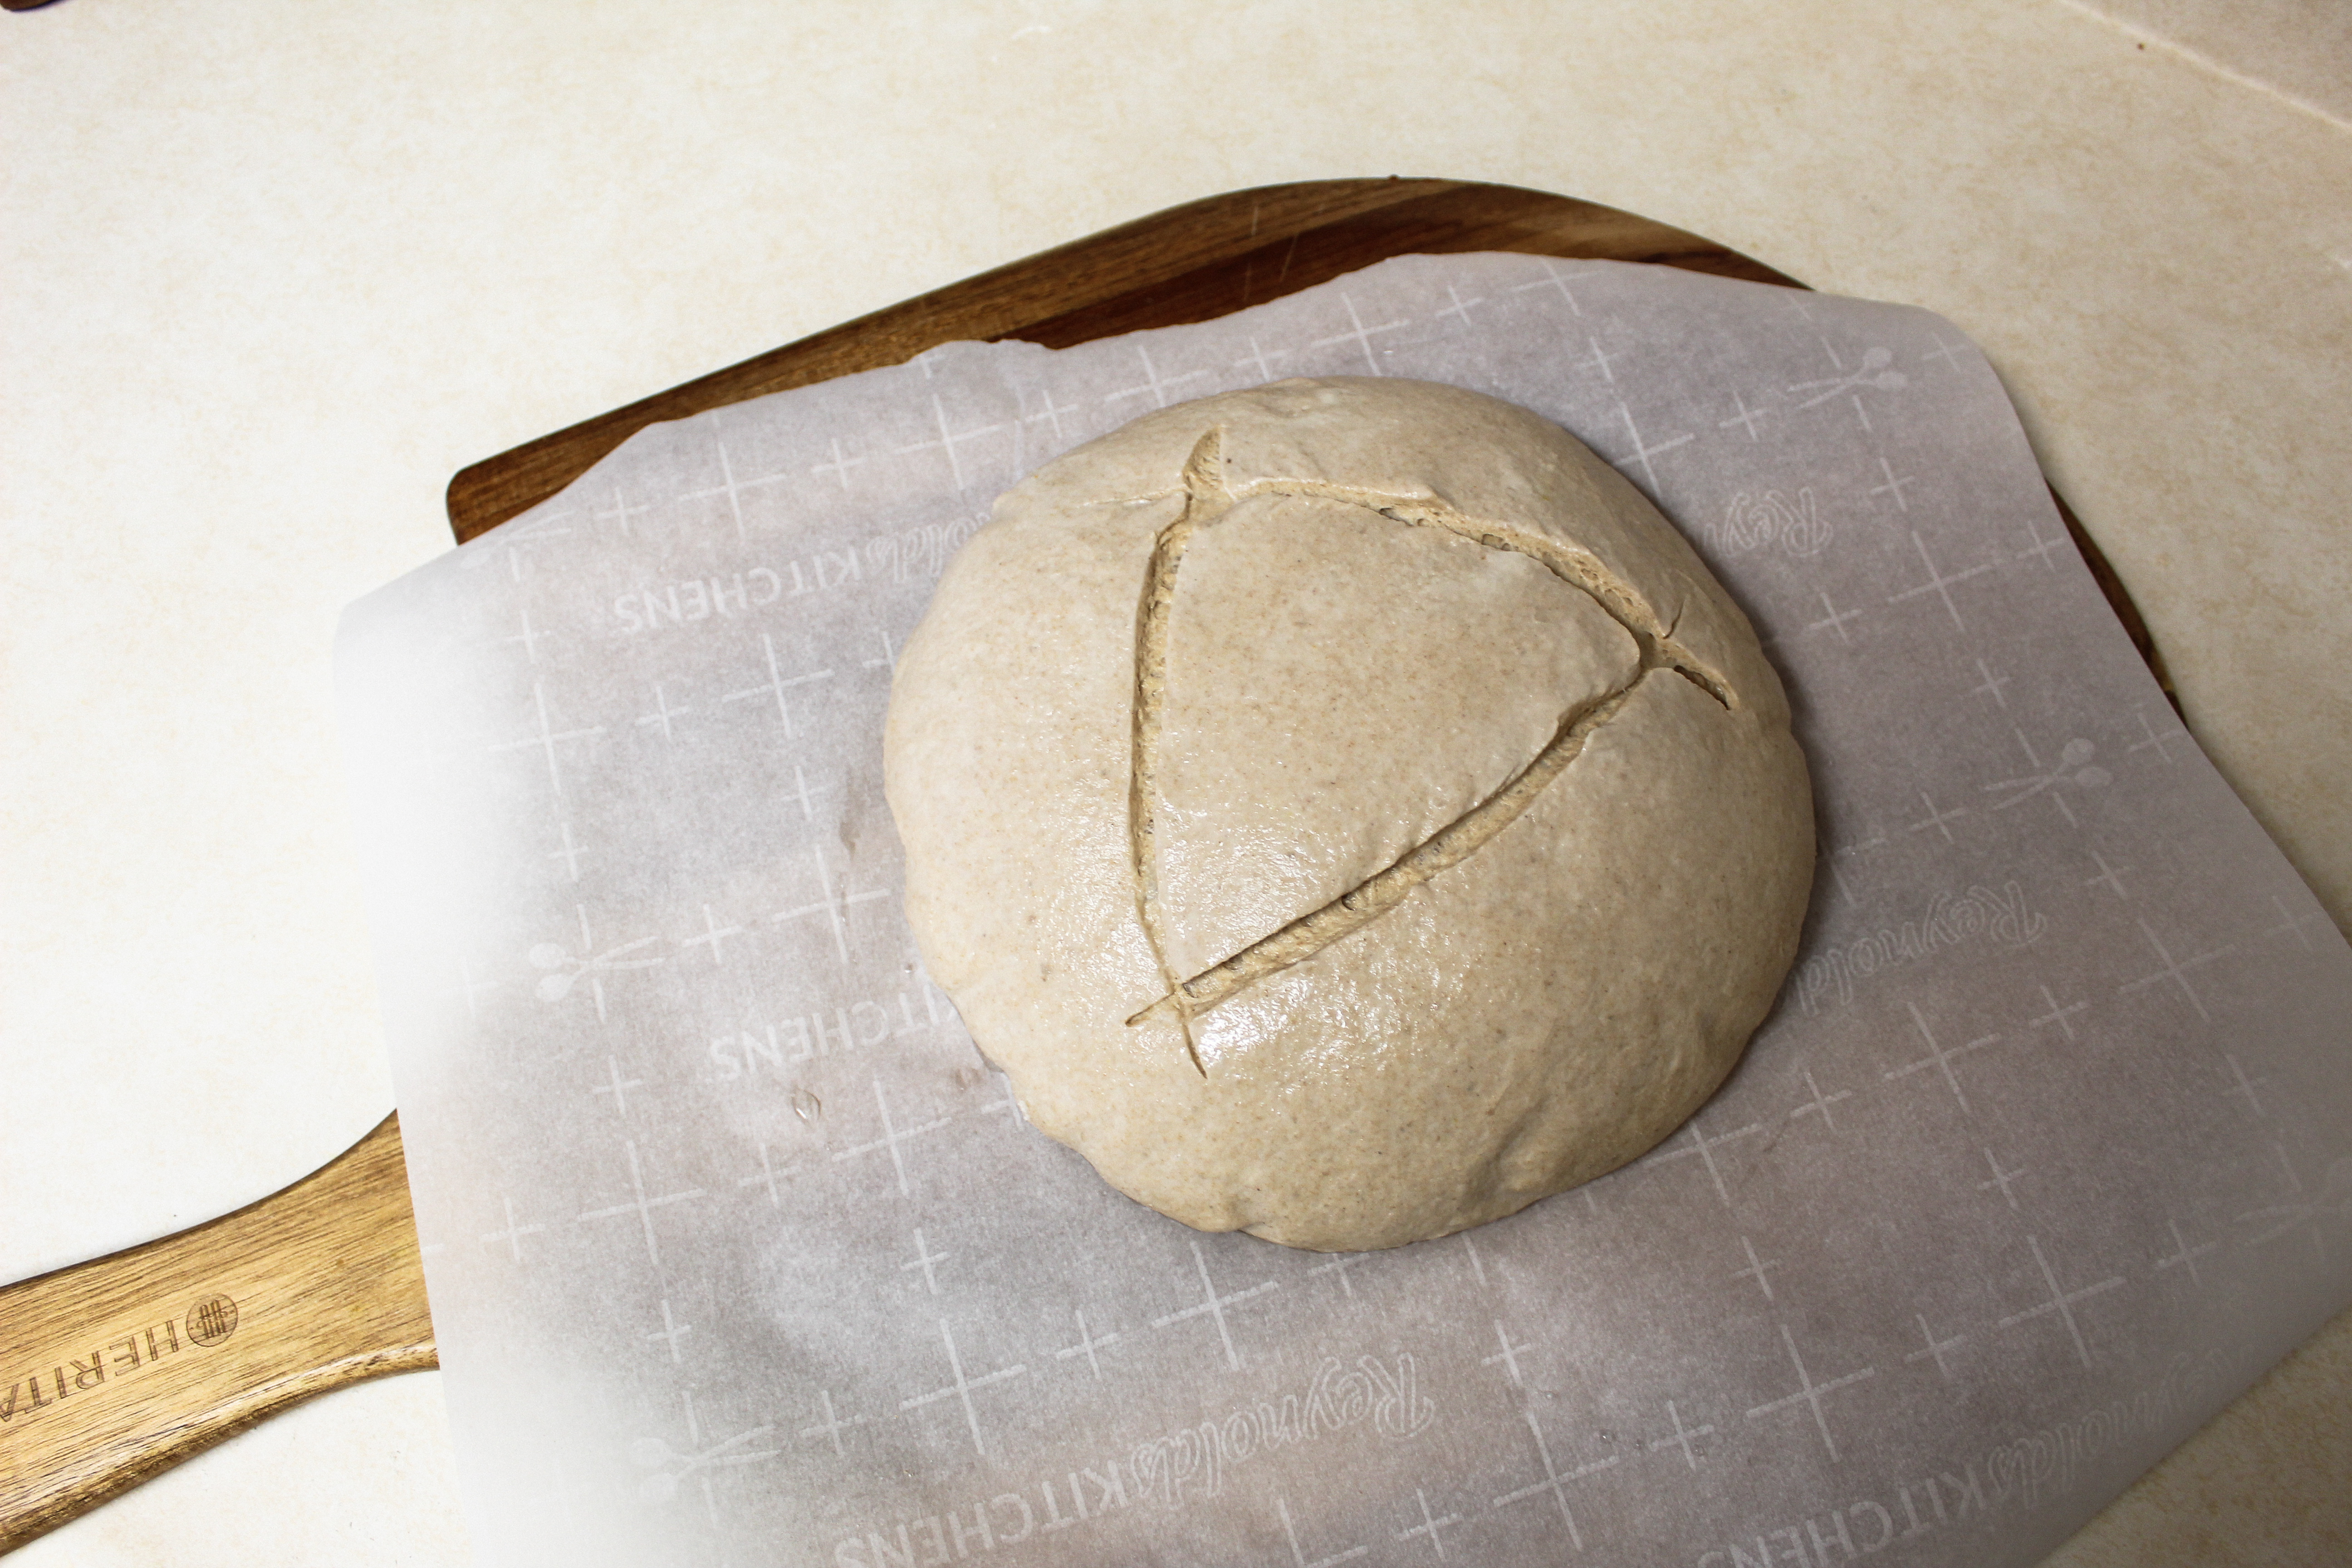
Your bread is ready for the oven! If you’re baking it in a pot – take the hot pot out of the oven (don’t forget oven mitts!) and remove the lid. Grab the parchment paper from two opposite sides, stretching it a bit and lower the bread along with the parchment into the pot. Close the lid and put the pot back into the oven. Set the temperature to 430F/220C and set a timer for 20 minutes.
If you’re baking on a stone or on the tray, just slide the bread in – parchment and all. Now remember that stainless steel bowl? Cover the bread with it to trap steam. If you don’t have a bowl, make you sure you have a pan of water steaming up your oven. Now set the temperature to 430F/220C and wait for 20 minutes.
After 20 minutes remove whatever you used for steam – the lid of the pot, the steel bowl or the pan of water. You will see that your bread is pale and looks raw. That’s good! It means the dough was properly steamed and your bread will have a golden crust. Close the oven and leave the bread for another 20 minutes.
Most beginner bakers tend to want to pull the bread out when it is barely golden, afraid to burn it. If you want a truly fantastic loaf, keep it in the oven a little longer than you normally would, until the crust is richly brown.
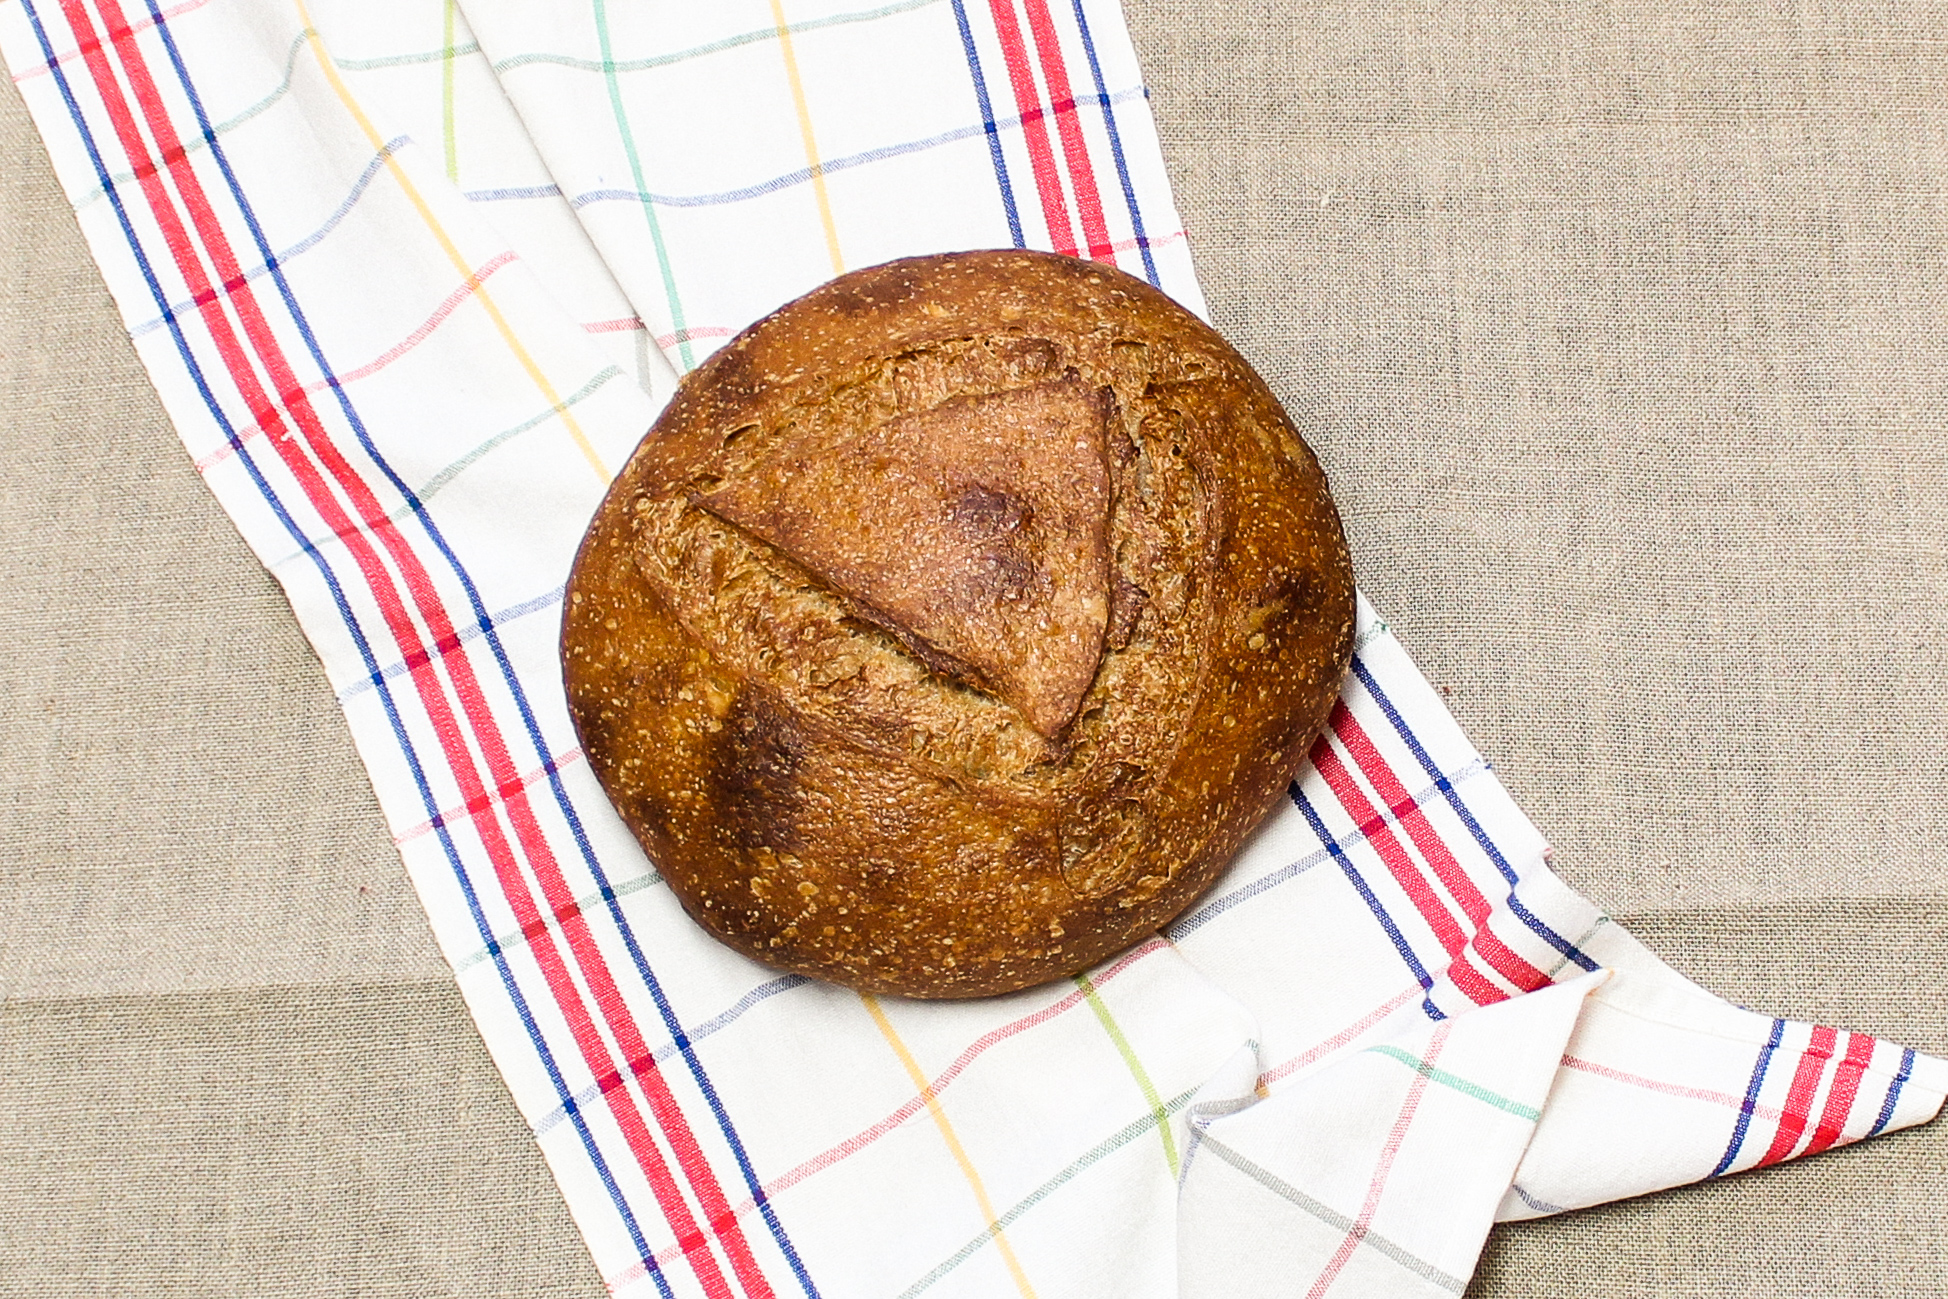
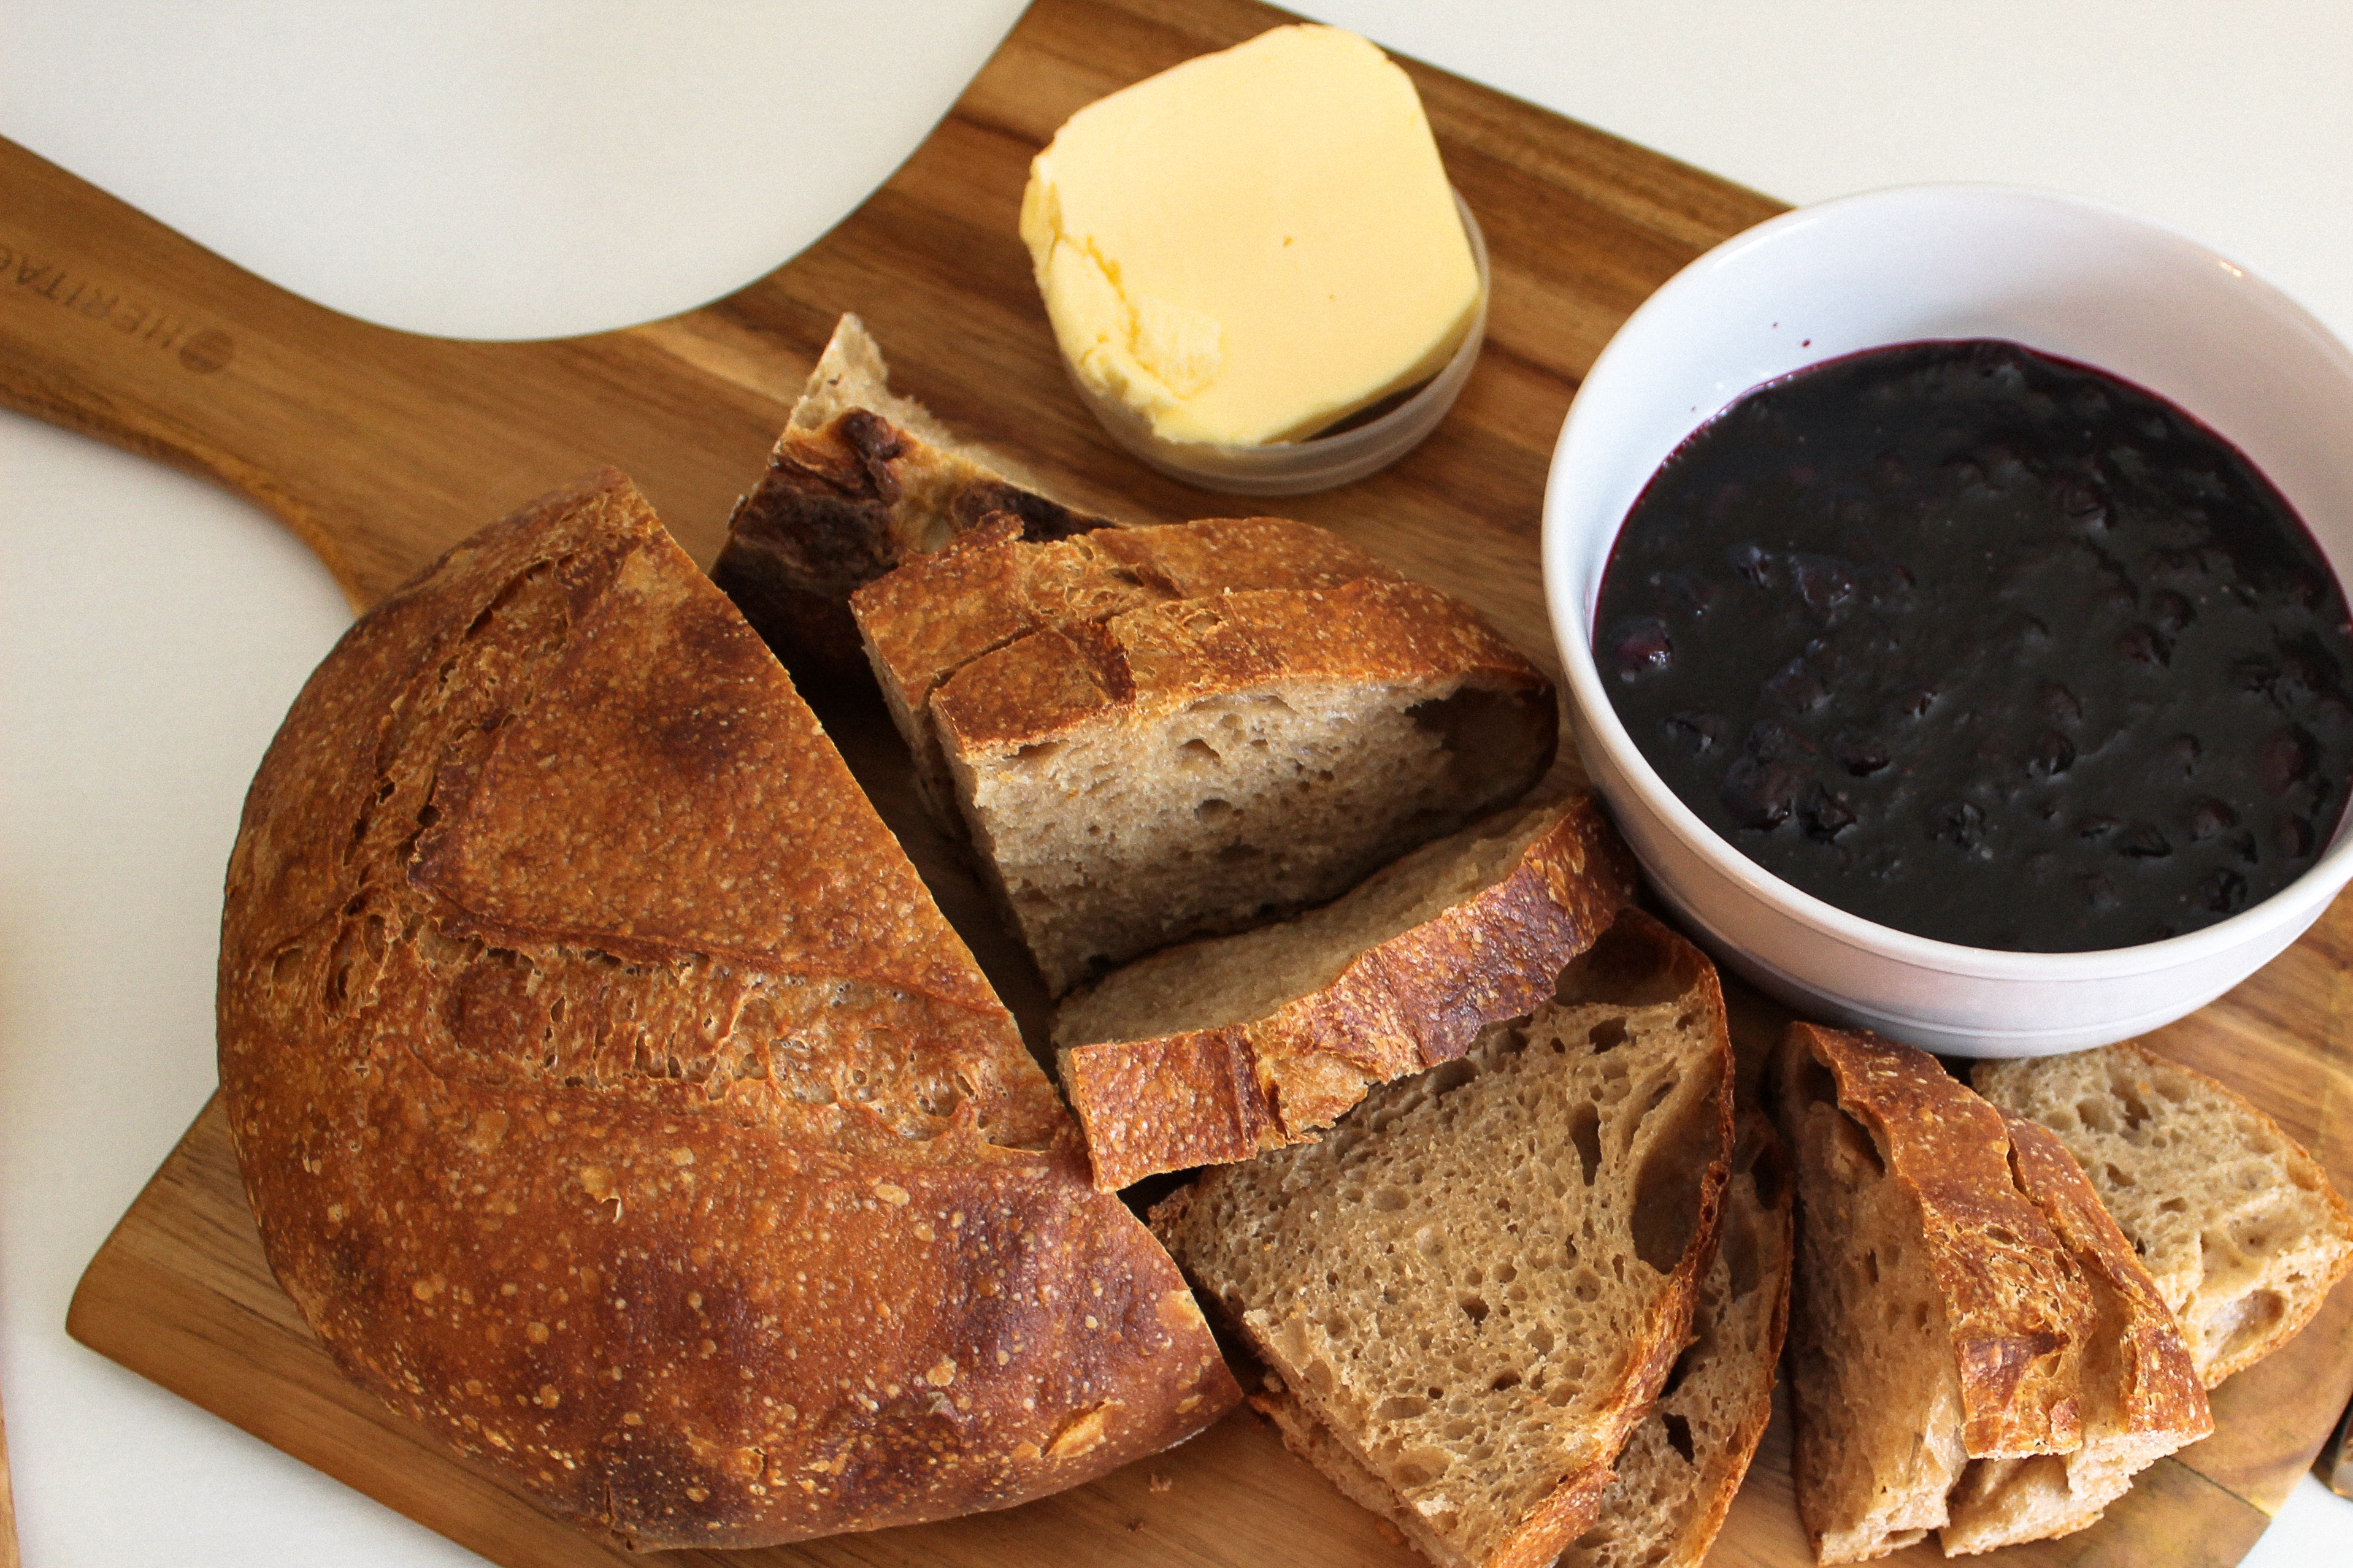
You will be rewarded with a beautiful, delicious and healthy loaf unlike any you’ve ever bought. It is hard to seriously mess up bread so that it’s inedible. Of course, baking is a skill and we all have much to learn, but no matter what goes awry you will still love the result. Even if it is not as puffy, as crunchy or as good-looking as you’d hoped, I guarantee you will still love eating it!
In time you will feel the need to tweak the process. You will add tools to your inventory, you will notice the moods of your starter, will be attuned to the tides of the dough and you will love every minute of it! But for now, even if you have never baked sourdough bread, there is really nothing keeping you away from that amazing aroma and feeling of accomplishment.
I can’t wait to see your wonderful loaves!

Wonderful tutorial!
Thank you so much!
LikeLike
Thank you, Egidio! I’m happy you liked it 🙂
LikeLike
I baked a loaf using this recipe and it turned out lovely. Thanks for the tutorial. I will be trying some of your other add in’s and different flour ratios.
LikeLike
I started my sourdough yesterday aphternoon phollowing your instructions. Just baking my phirst loaph now. The Phinal prooph looked amazing. Will post pictures on Phacebook.
Thanks phor the detailed tutorial.
The Phood Foto Guy
LikeLike
I’d love to see how it turned out 😊
LikeLike
Do you have recommendations for references on how to troubleshoot?
LikeLike
I’m working on one, but if you tell me what went off maybe we can work it out 😉
LikeLike
Hi and thank you for your very informative tutorial. As I am a (very enthusiastic) sourdough beginner I find this very helpful. Just one question though, because my first attempt at baking was a total failure 😦 my second ferment developed a crust on the top and now I wonder how come it didn’t happen to you? It rose and then dropped down so I ended up with a very hard crust and dough. Do you have any advice for a working mum (8-17 h), how can I have a fresh loaf every day, some time-line? Can I leave it in the fridge all night (after the shaping step) and most of the day and then bake it when I come home from work?
LikeLike
Thank you so much for taking the time to give it a try! Hmm.. did you keep your pre-ferment covered? Regarding your second question – yes, you can keep it in the fridge all day! If you plan to do that shape the dough 15 minutes after the last stretch (do not wait the 1,5 – 2,5 hours). The dough will be less voluminous when you put it in the fridge but it will catch up!
LikeLike
I just made a beautiful, perfect loaf using your technique and recipe. This is my fourth attempt (prior ones being to dense and not as airy). Thank you so much for this. Enjoying my bread as I type.
LikeLike
Your comment is music to my ears 😊 I’m so happy it worked for you!
LikeLike
I have a question: Can you double the recipe to make two loaves? I’m not too familiar with the science behind it all.
LikeLike
Hi there! New here. I have my starter pre fermented and ready and now I can get mixing. The flours I have are Bread Flour, Rye and regular white all purpose. I don’t have a whole wheat so is there a mix I can make with these three flours? I saw your other post where you called out blending three different flours and was wondering how and if I can blend these? I’m not sure of the properties of different flours so I have no clue how much of each either or can I just go with one or even two.
LikeLike
Hi Kim and yay for your first upcoming bread! For your first one I suggest you use only bread flour. If you don’t have enough, you can add the all-purpose to substitute. When you’ve gotten the hang of bread-making and feel adventurous, you can try a mix of 350g bread flour and 50g rye. 😊 Only use all-purpose if you don’t have bread flour on hand. Good luck with your first loaf and let me know how it hoes 🤗
LikeLike
Which flour did you use for this recipe? 100% wholewheat?
LikeLike
I used stoneground white, which is very finely sifted. If this is not available to you, I suggest you substitute with 350g white bread flour and 50g wholegrain.
LikeLike
Have you got a whole grain recipe and technique to get an aired open crumb?
LikeLike
Anna I love your practical approach to bread making. My process is nearly identical with four cups of freshly ground einkorn and two cups of water. I really appreciate the videos on stretch= and=fold and shaping. May I use them on our blog at AbigailsOven.com (with attribution of course)?
LikeLike
Thank you for your kind words! As long as you credit me, you’re free to use it 🙂
LikeLike
Thank you for the wonderful directions! Since we are staying home during this time of the Corona virus, I took the time to read, watch videos, and study how to make a nice round with my starter. It was a success, thanks to YOU! I uploaded a photo you may view on Google Doc. Here is the link: https://drive.google.com/file/d/1IzqylH-7EHxAbI2q1Ev5iRELLJKjW2Ik/view?usp=sharing
LikeLiked by 1 person
Thank you for this recipe, I’ve been able to make really terrific bread every time! I’m curious if you use a sifter when baking bread?
LikeLike
I’m so glad this recipe has been working out for you! No, I do not use a sifter when making bread. you work the dough hard enough for any sifted-in aeration to be useless.
LikeLike
Hi great recipe and easy instructions. Can you please confirm if you cook bread straight from fridge OR do you get it out from fridge and wait on bench till oven is up to temp. I don’t have much success just taking it straight from fridge to the oven ? Cheers
LikeLike
Hi and thank you for reading! I score it straight out of the fridge. Can you tell me what seems to go wrong for you? Maybe we can figure it out together.
LikeLike
Hi Anna
When I take from fridge, score and place straight into oven I never get the rise that I do when I leave on bench for 30 mins or so to bring back to room temp. Have tried a number of times and the loaf is always much ‘flatter’ – less rise .
LikeLike
Chrissy, this tells me that your bread benefits from a little more time to proof. Try proofing it 30 minutes longer before you put it into the fridge. It really should not matter how cold the loaf is when it hits the oven. Hope this helps!
LikeLike
Anna thank you for answering my first question above. I really appreciate that. My first loaf really got some nice rise after going into the oven. It did crack at the top but that’s ok because the bread was still delicious. I have noticed that your dough after the 10 hours of rest in the fridge has really puffed up where mine is no where near as puffy. I don’t know what caused my second batch of breads to not be as tall. Now on batch 3 and I just checked my dough and again it hasn’t risen much at all in the fridge over night. I am now at 12 hours of fridge time. Just so you know, my starter rises in the jar nicely, more than doubles and floats on the water but is it possible it’s not quite strong enough yet and that’s why my subsequent loaves have been lacking?
LikeLike
Thank you for instructions and videos, it is so helpful. Will this recipe also work on the loaf with your detailed scoring pattern as well? or do I need to adjust by increasing more wheat flour and decreasing white/bread flour?
LikeLike
Hi and thank you for visiting my blog! This recipe should work great for scoring!
LikeLike
Great blog I ennjoyed reading
LikeLike